Rank tracker
Manage your Google Maps scans in Scan history
Find any grid scan, read its rank and status at a glance, reopen its report, update its rankings, turn scans into a recurring scan and delete the ones you no longer need.
Updated October 5, 2026 · 5 min read
Scan history lists every grid scan in your workspace, one-time and recurring, grouped by business. From here you reopen any report, check how each scan went at a glance, run scans again to get fresh rankings, turn them into recurring scans and delete the ones you no longer need.
The screenshots use a made-up plumber called Your Business in Austin, TX, plus one scan of a competitor, Main Street Plumbers. Your list shows your own scans.
- Where
- The left sidebar → Scan history.
- Who
- Every plan. Only the workspace owner and admins can delete scans.
- Cost
- Browsing and opening reports is free. Updating rankings runs new scans and uses scan credits.
Open Scan history
Click Scan history in the left sidebar. Your scans are grouped by business, newest first, and each business row shows how many scans it has.
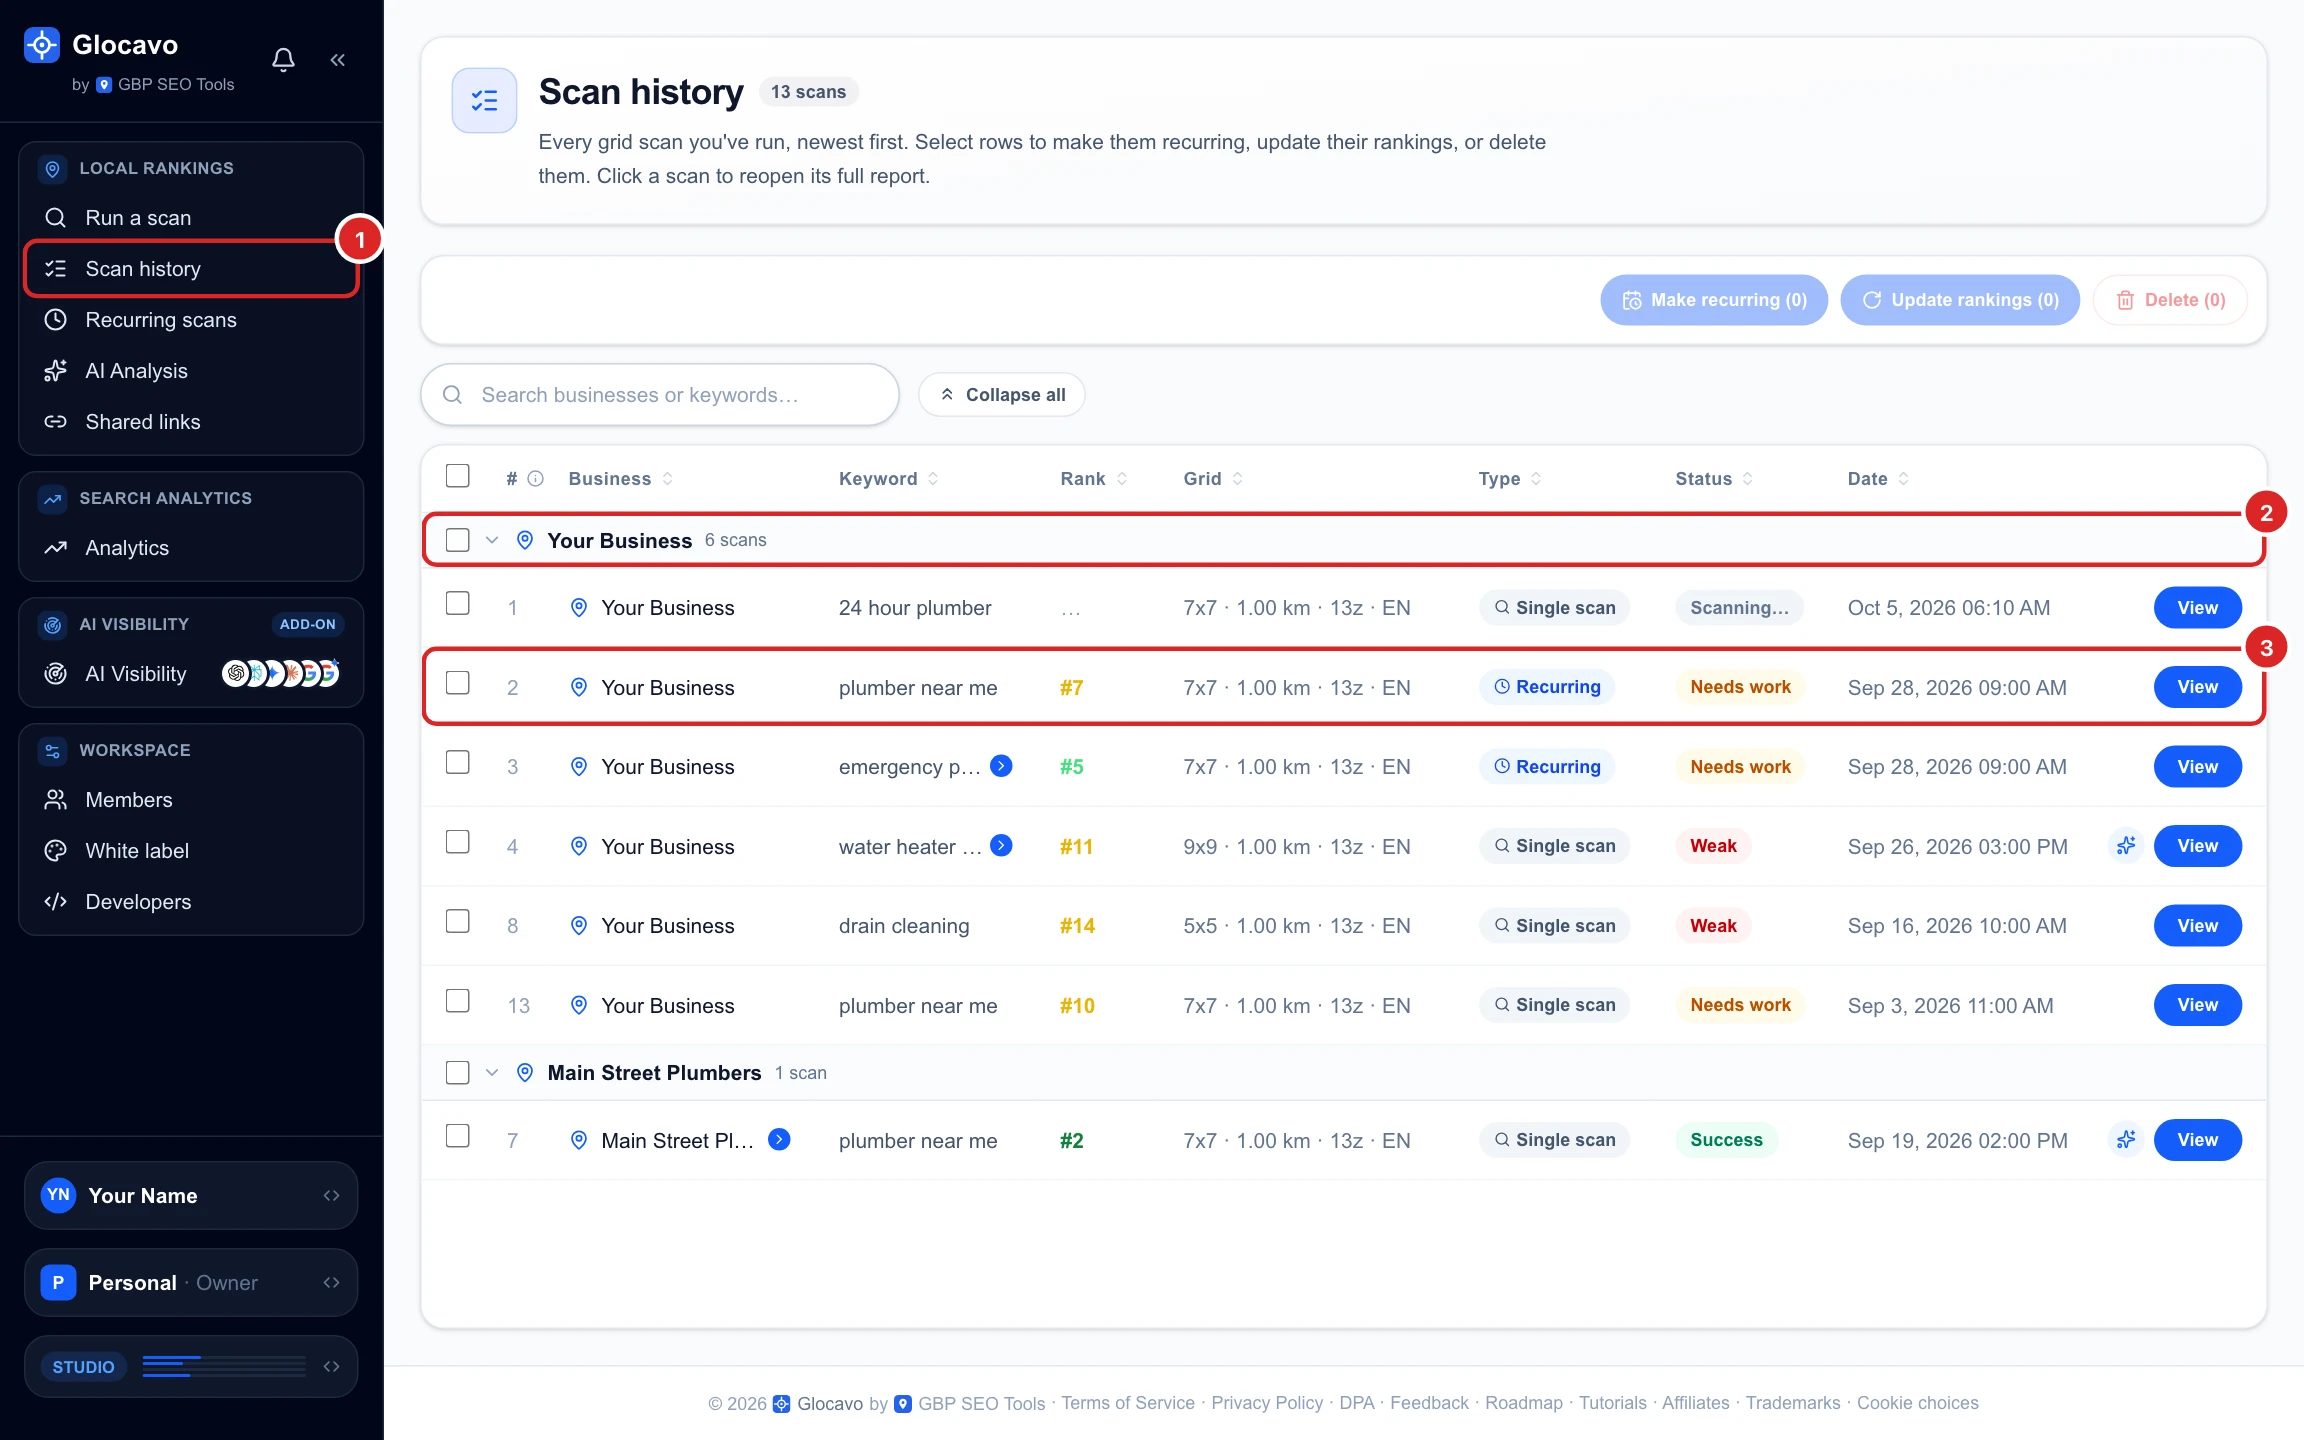
Scan any business you like, not just your own. Scanning a competitor for the same keyword, like Main Street Plumbers here, shows you what a stronger map looks like in your area.
Read a scan at a glance
Each row is one scan of one keyword. Besides the business, keyword and date, it shows:
- Rank: your average rank over every point of the grid. Points where you are not in the top 20 count as 21, so a low number means you rank well across the whole area, not just near your address. The colour follows the map pins, and 20+ means you were not in the top 20 anywhere.
- Grid: the scan’s settings: grid size, distance between points, map zoom and language. 7x7 · 1.00 km · 13z · EN is 49 points, 1 km apart, at zoom 13, in English.
- Type: Single scan for a one-time scan, Recurring for one run by a recurring scan.
- Status: a quick verdict on the average rank. Success is the top 3 (the map pack), Needs work is 4 to 10, Weak is worse than 10. A scan that is still running shows Scanning… and fills in on its own when it finishes.
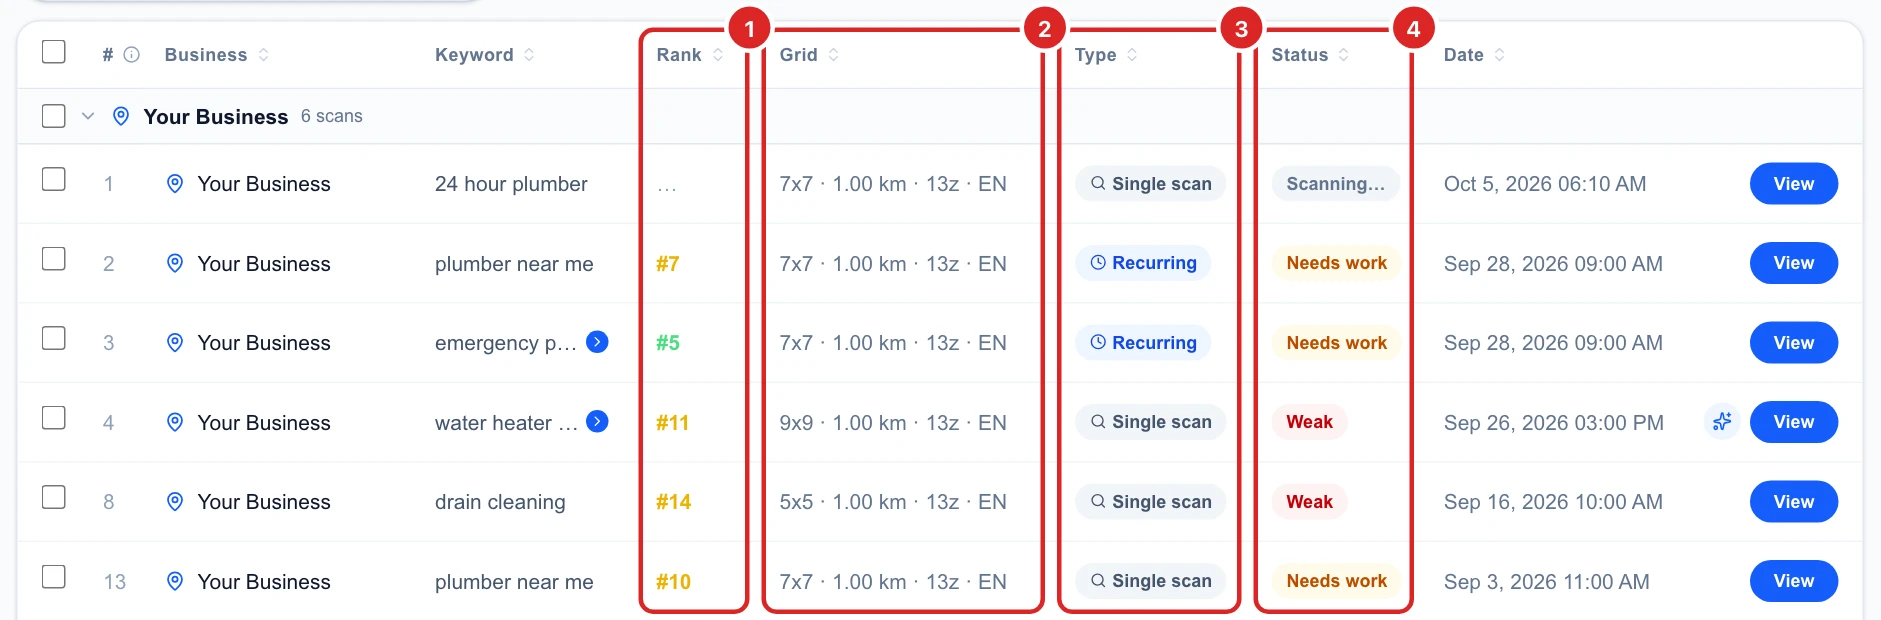
The # column is each scan’s place in your whole list in the current sort order, not a row count, so the numbers skip when another business’s scans fall in between.
Understand how recurring scans are listed
A recurring scan runs every keyword as its own scan, every time it runs. To keep the list short, Scan history shows one row per keyword: its latest run. In the screenshots, a weekly recurring scan for plumber near me and emergency plumber has run four times, but each keyword appears once. That’s why the count at the top (13 scans) is higher than the number of rows.
The earlier runs are not gone: open the report and pick another date to see them, or compare runs side by side. Click a Recurring badge to jump to that recurring scan under Recurring scans.
Find a scan
- Search: type a business name to see all of its scans, or the start of a keyword to see only the scans for that keyword.
- Sort: click a column title, for example Rank to see your best scans first. Click it again to reverse the order.
- Collapse all folds every business into one line, handy with many businesses. Click a business row’s arrow to fold or unfold just that one.

A long business name or keyword is cut short with an arrow next to it. Click the arrow to show it in full.
Open a report
Click the business name or View to open the full scan report, on the Rank Map. A blue sparkle icon next to View means the scan already has an AI Analysis: click it to go straight to it, without paying for a new one.

To read the report, see how to read your Google Maps rank map and the AI Analysis guide.
Update rankings
To get fresh rankings for one or more scans, tick their boxes, click Update rankings, then click Confirm update within a few seconds. The second click is there so you never spend credits by accident.
Each selected scan runs again as a new scan with the same business, keyword, grid, distance, zoom and language, and costs the same as running it for the first time: one scan credit per point. Here, a 9x9 and a 5x5 scan cost 81 + 25 = 106 credits. The old scans stay in the list, so you can compare before and after.
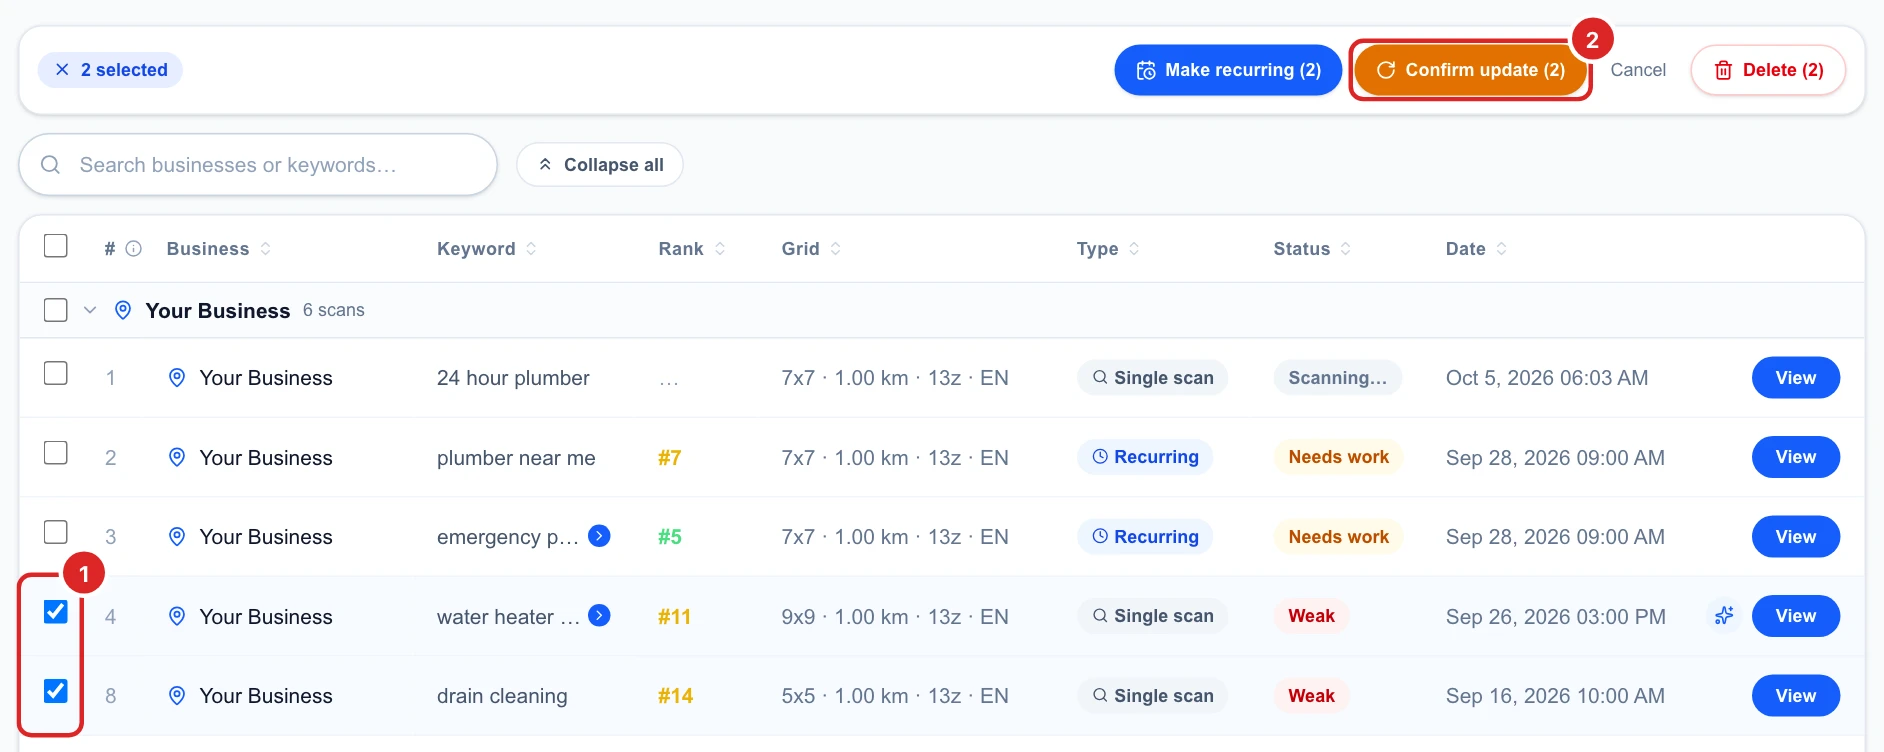
Update rankings scans the full grid again, including any pins you turned off in the original scan. To keep pins off, run the scan from Run a scan instead and turn them off again. To select many scans at once, tick a business row to select all of its scans, or the box in the header to select the whole page.
Make scans recurring
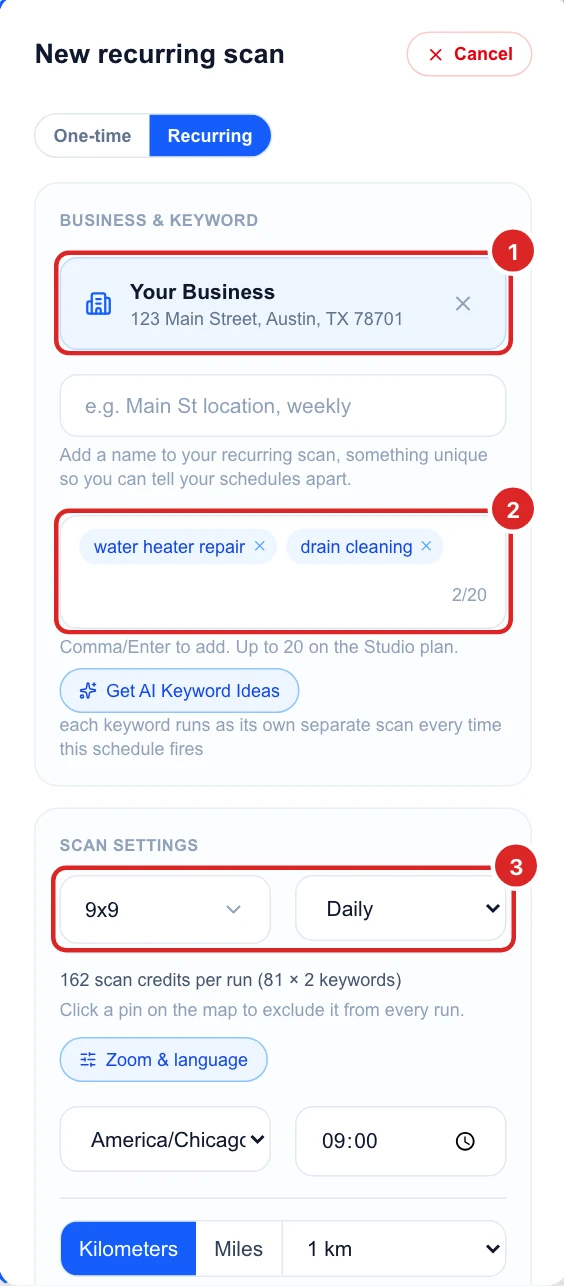
If you keep running the same scans by hand, let Glocavo run them for you. Select scans of one business and click Make recurring. A new recurring scan opens, already filled in with:
- The business.
- Every keyword you selected, each one run as its own scan.
- The grid size and distance of the selected scan highest in the list.
Check how often it runs and the time, then save it. The form shows what each run costs, here 162 credits (81 points × 2 keywords).
Make recurring is greyed out when the selection includes more than one business: a recurring scan is always for one business. A weekly or monthly schedule is usually enough and uses a lot fewer credits than daily.
Delete scans
Select the scans, click Delete, then Confirm delete. Changed your mind? Click Cancel, or just wait a few seconds and the button resets.

Deleting is permanent and doesn’t give scan credits back. The scan’s AI Analysis and its shared link are deleted with it, so anyone you sent the link to can no longer open it. Deleting a recurring scan’s row doesn’t stop the recurring scan: pause or delete it under Recurring scans.
Decide what to do next
- Sort by Rank or Status to find your weakest keywords, then open their reports to see where on the map you lose.
- After a few weeks of work on your Google Business Profile, update the rankings of those keywords and compare the new scan with the old one.
- Turn the keywords you check every week into one recurring scan, so the history builds up on its own.
- Keep an eye on your credits: how scan credits and AI Power work.