AI Visibility
Use AI Visibility data in Claude, Zapier and more
Create an AI Visibility API key, ask Claude or ChatGPT about your results through MCP, and send your AI score and wrong facts to Zapier, Make, n8n, Google Sheets or your own dashboard with the REST API.
Updated September 28, 2026 · 7 min read
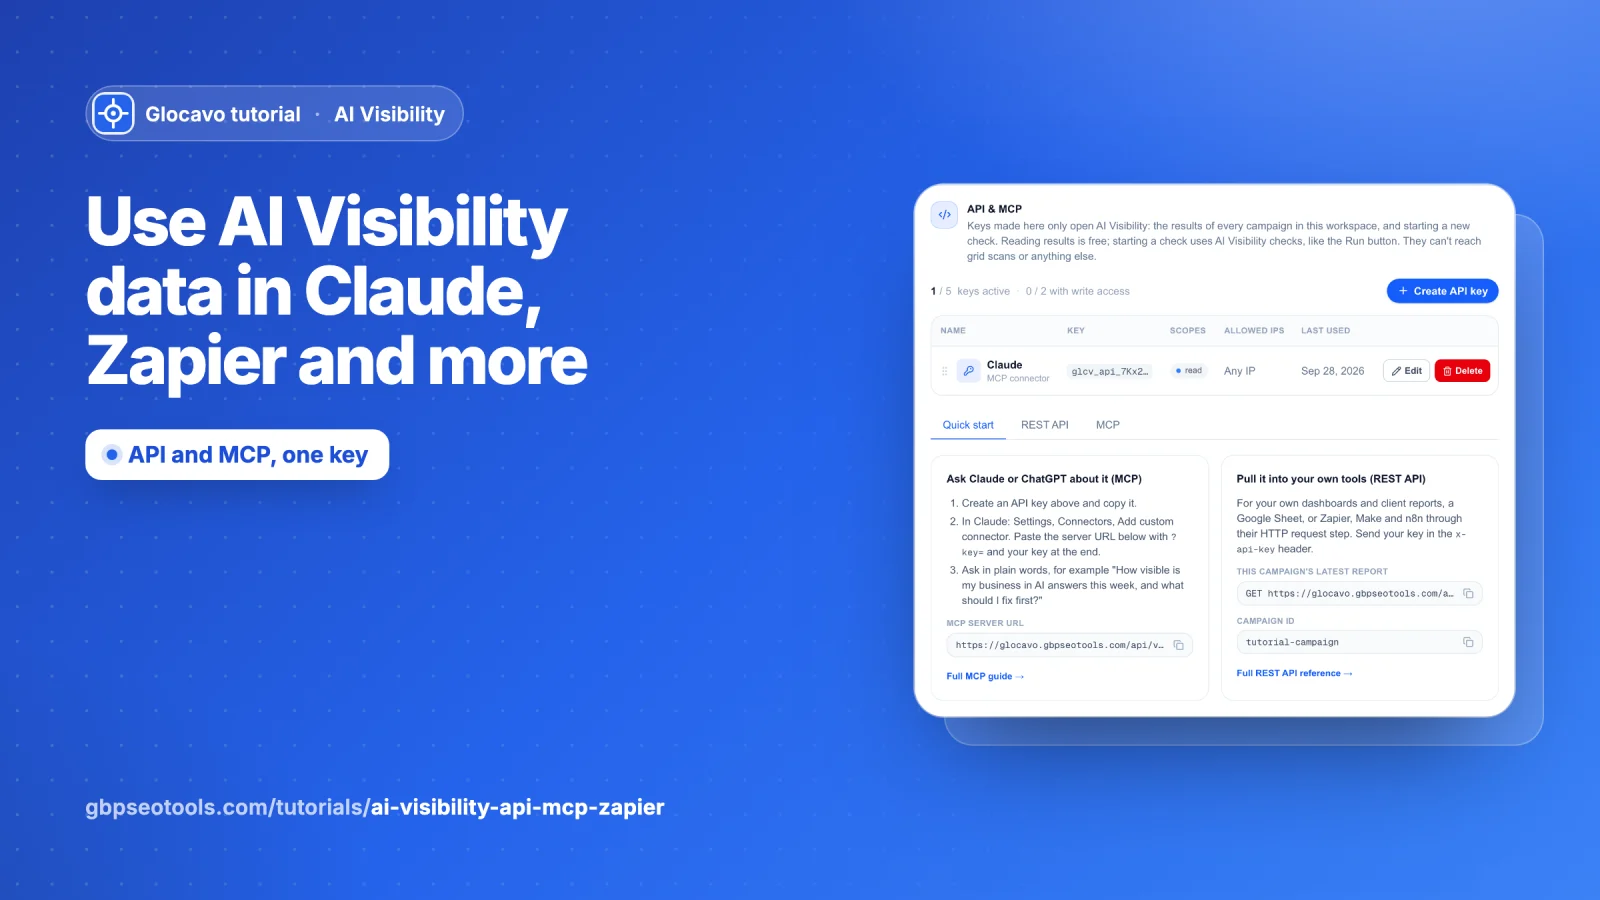
Your AI Visibility results do not have to stay inside Glocavo. With one API key you can ask Claude or ChatGPT about them in plain words, pull them into a Google Sheet or your own dashboard, or send them on with Zapier, Make or n8n: a weekly Slack message with your AI score, an email when a wrong fact appears, a row in a client report.
- Where
- Open a campaign → API & MCP in the campaign menu.
- You need
- The $99.99 AI Visibility add-on level, on any plan. Studio and Agency plans can use their Developers API keys instead.
- Cost
- Reading results through the API or MCP is free. Starting a new check uses checks, like the Run button.
Your API key
Open API & MCP
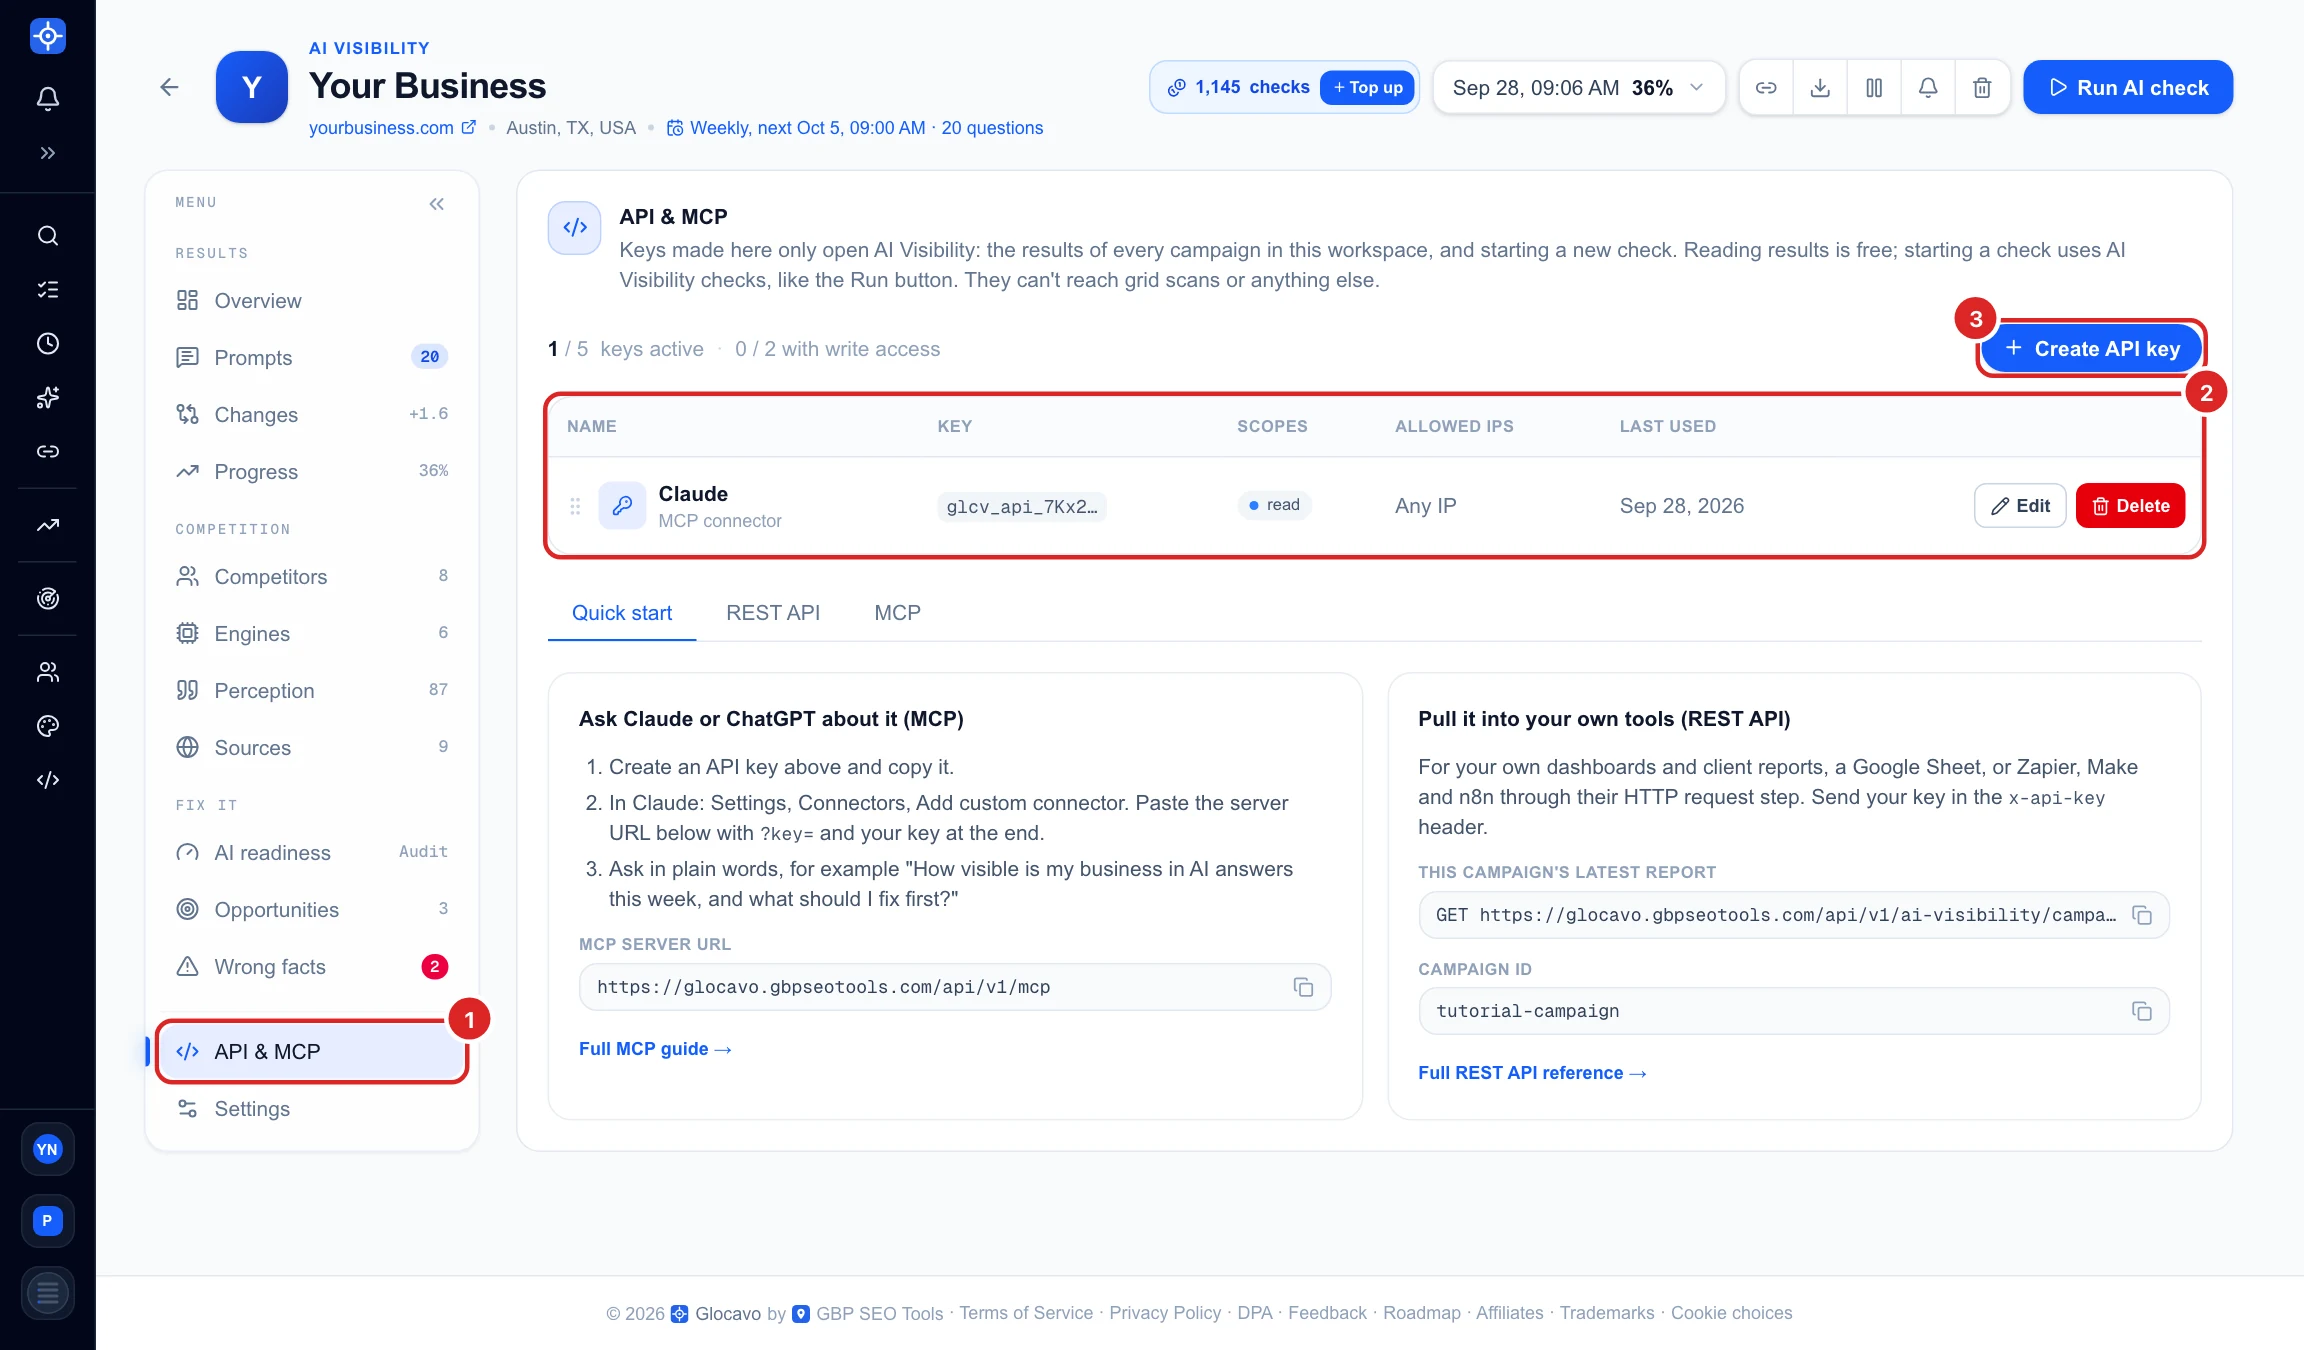
Click API & MCP (1) in the campaign menu. Your keys are listed in a table (2) with their name, the start of the key, what they are allowed to do, the IPs they work from, and when they were last used. Create API key (3) makes a new one.
A key made here only opens AI Visibility: every AI Visibility campaign in this workspace, and nothing else. It cannot reach your Google Maps grid scans.
Create a key
Make one key per tool, so you can switch one off without breaking the others.
- Name (1): where you will use it, for example Zapier or Claude.
- Allow write access (2): leave it off unless the tool should start new checks. A read-only key can read every report but can never spend checks.
- Allowed IPs (3): optional. Only requests from these addresses are accepted. Leave it empty for tools like Zapier, whose addresses change.
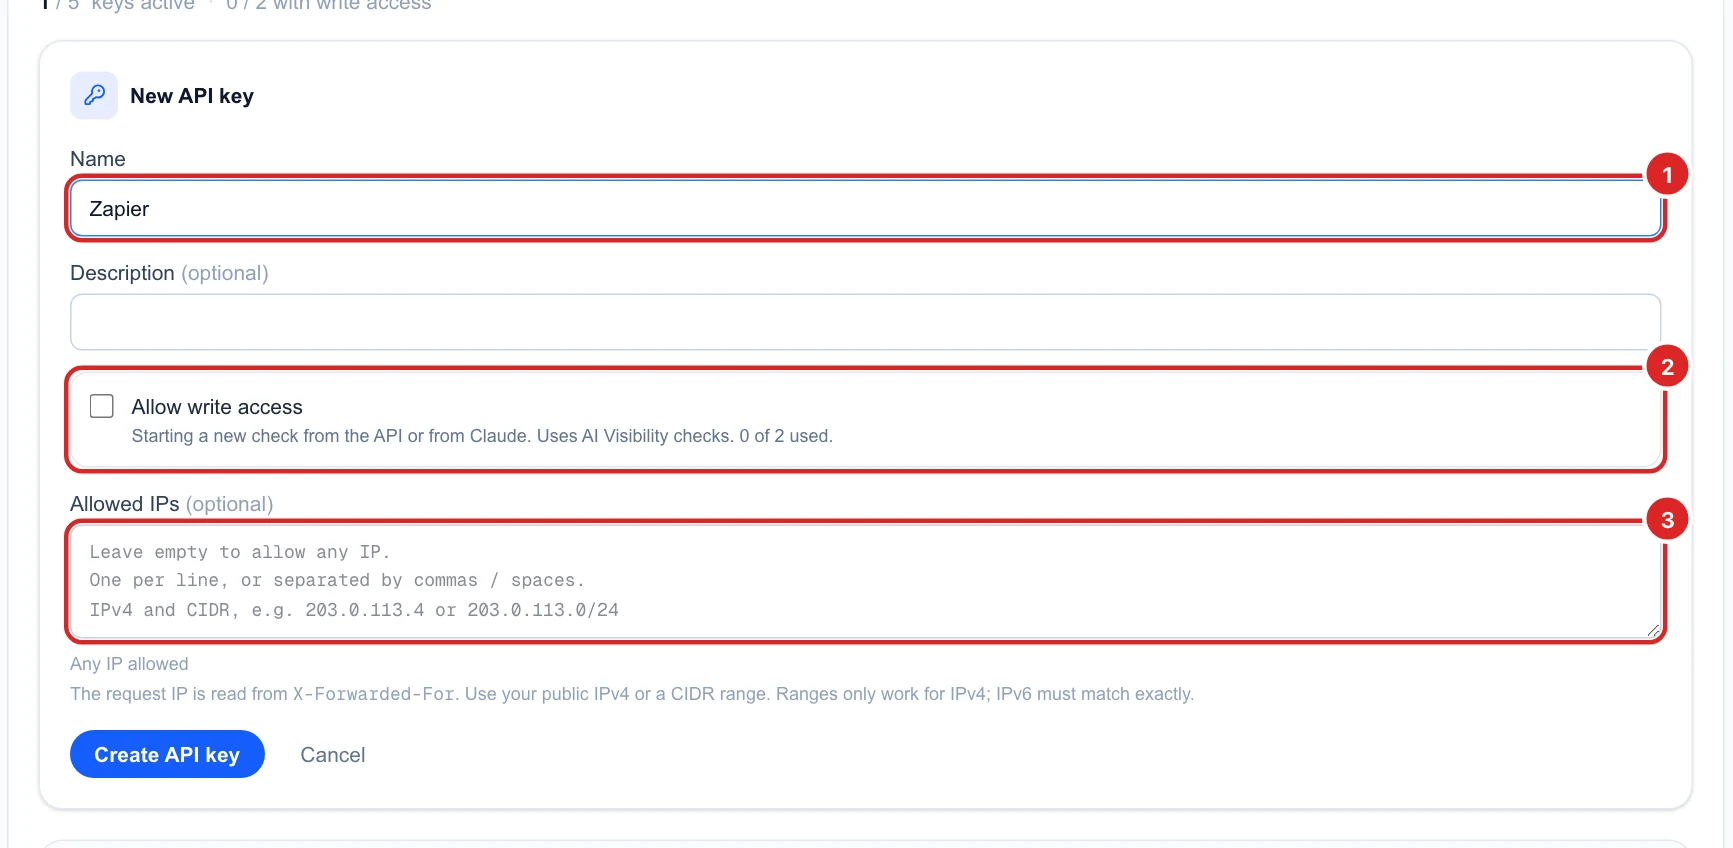
You can have up to 5 active keys, and up to 2 of them with write access.
Copy the key
The full key is shown once, right after you create it. Click Copy (1) and paste it where you need it, or in a password manager. After you click I’ve saved this key, only its first characters are shown. Lost a key? Delete it and create a new one.
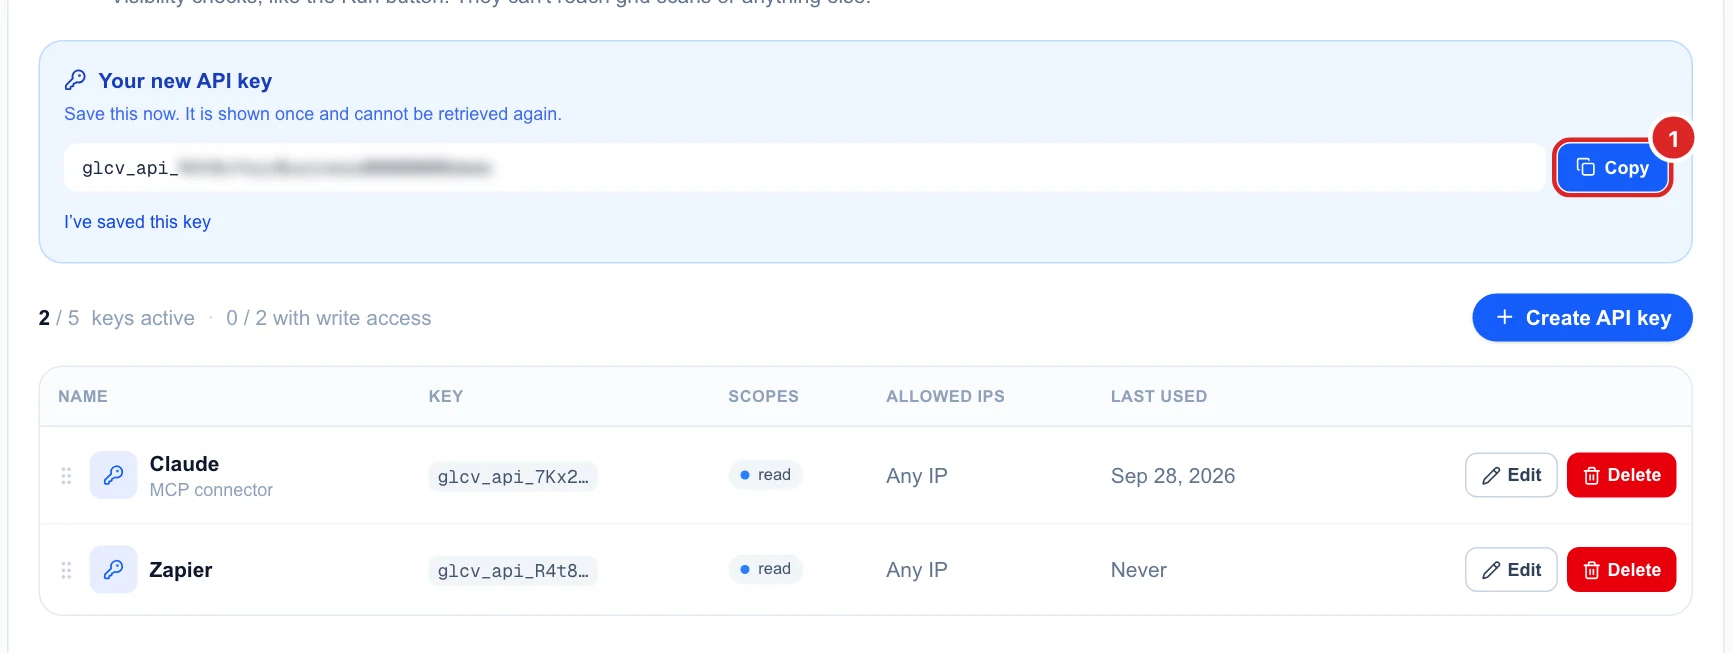
Treat the key like a password: anyone who has it can read your AI Visibility results. Never put it in a shared spreadsheet cell or a public page.
Find the addresses you need
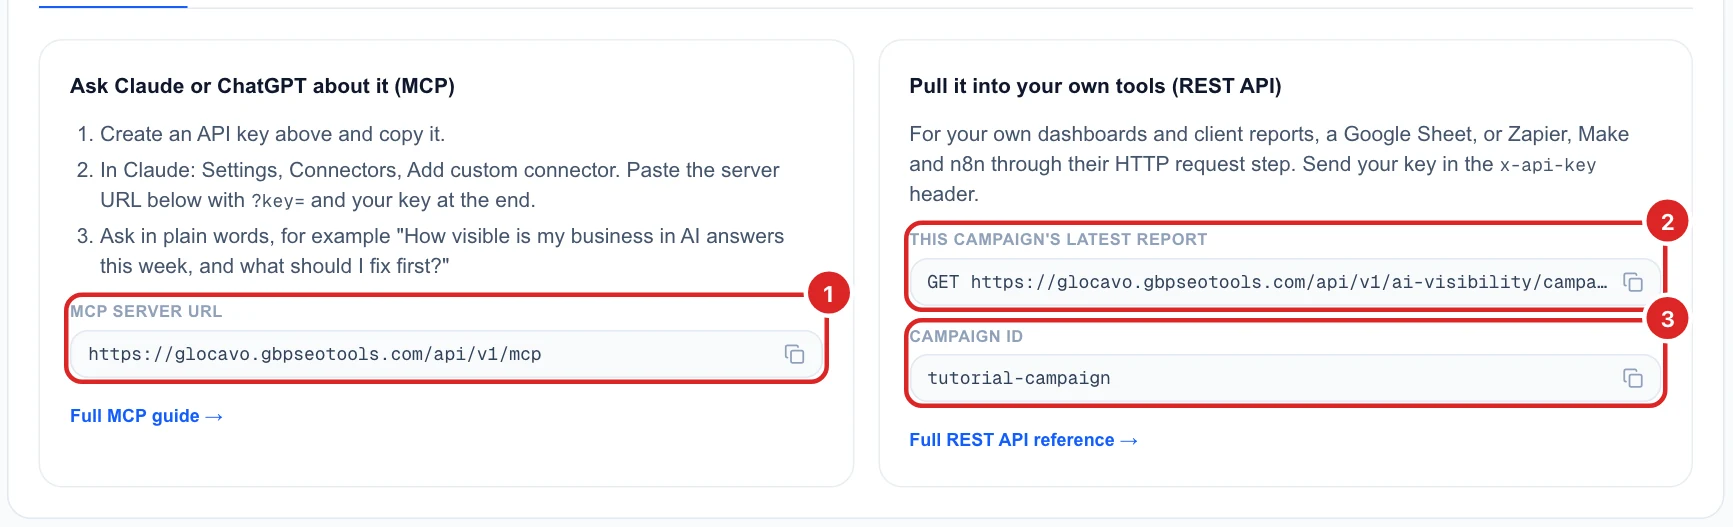
The Quick start tab has everything to copy:
- MCP server URL (1): for Claude, ChatGPT and other AI assistants.
- This campaign’s latest report (2): the address that returns this campaign’s newest results, for Zapier, Make, n8n, Google Sheets or your own code.
- Campaign ID (3): the id of this campaign, used in every address.
Ask Claude or ChatGPT (MCP)
Connect an AI assistant
MCP lets an AI assistant read your AI Visibility results for you. Once it is connected, you ask in plain words, for example “How visible is my business in AI answers this week, and what should I fix first?” or “Which questions does ChatGPT answer without naming us, and who does it recommend instead?”
The MCP tab has the server address (1) and the steps for Claude (2): add a custom connector, paste the address, set authentication to None, and add your key as an x-api-key header. The same address works in ChatGPT and any other assistant that supports custom MCP connectors.
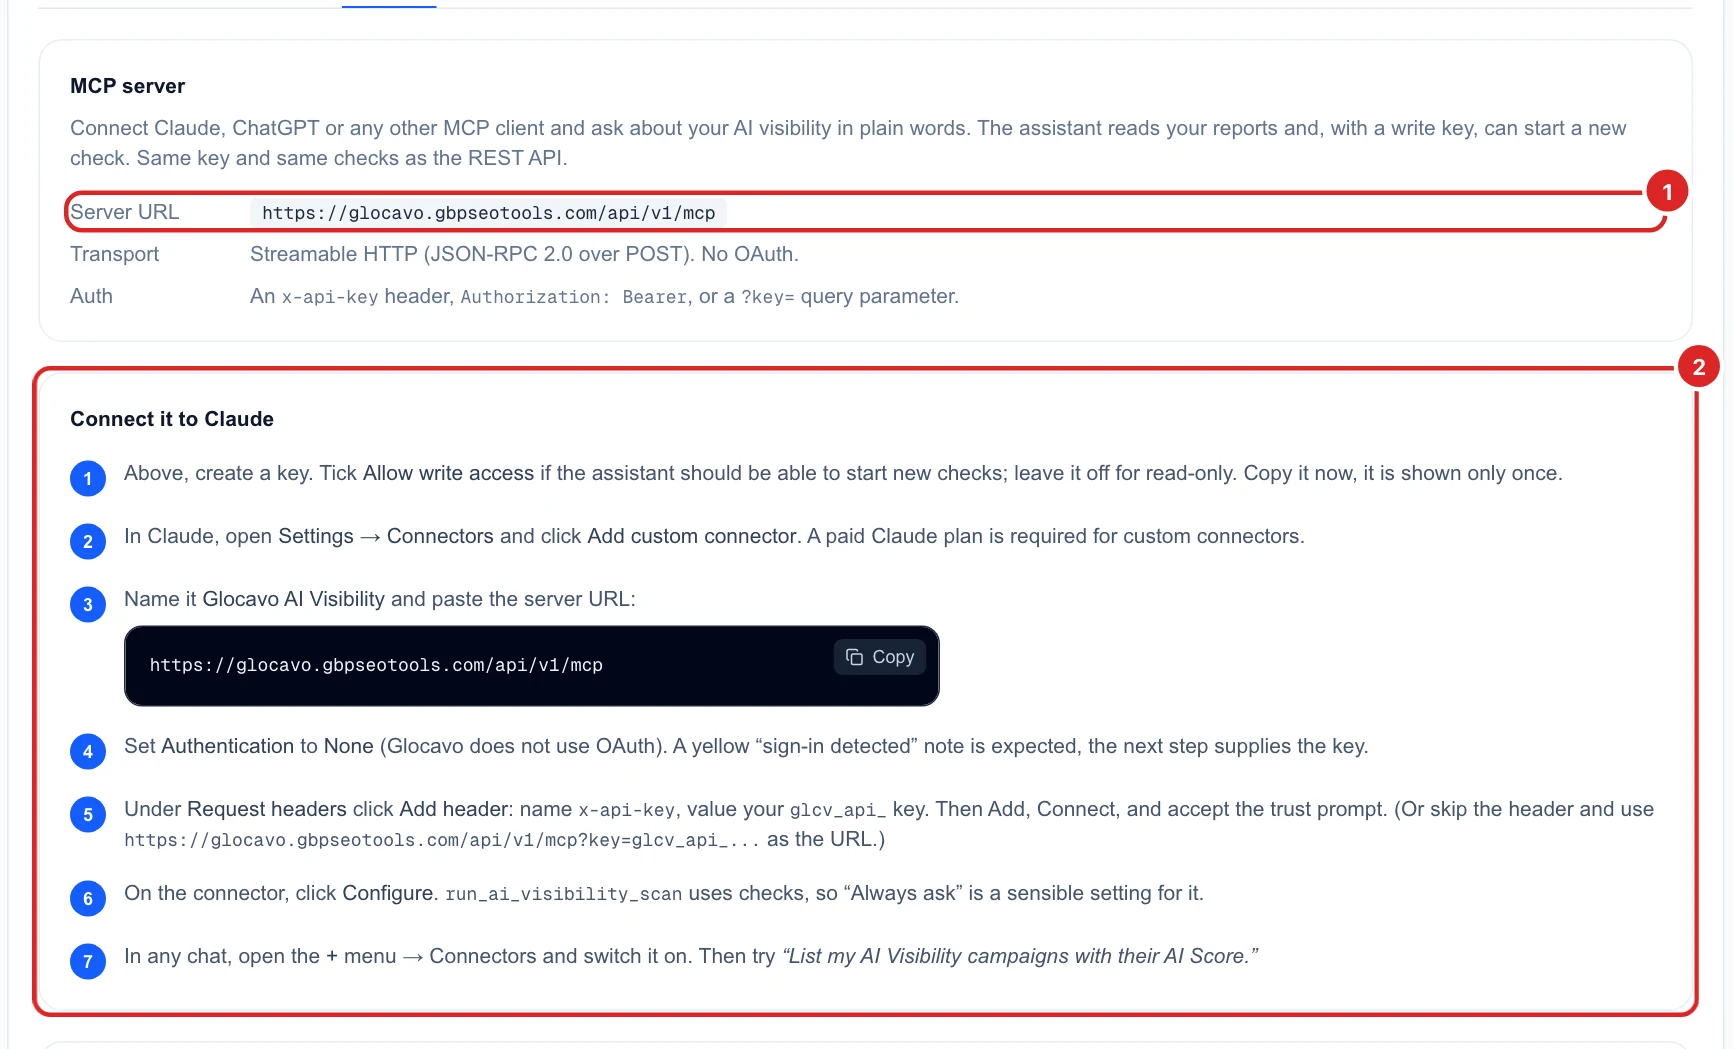
Every click, with screenshots from Claude itself, is in Connect Glocavo to Claude with MCP.
Know what the assistant can do
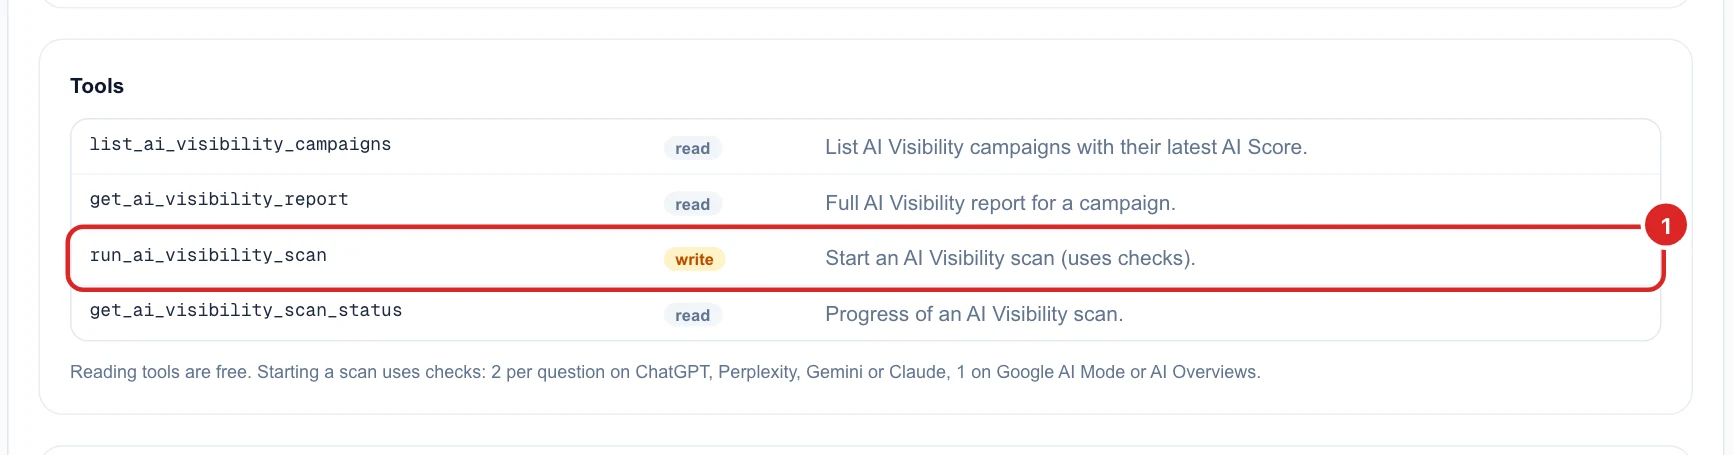
The assistant gets four tools: list your campaigns with their AI score, read a full report, check a scan’s progress, and start a new scan. Only run_ai_visibility_scan (1) uses checks, and only with a key that has write access. In Claude, set that tool to Always ask so nothing runs without your OK.
Use Claude Code or another MCP client
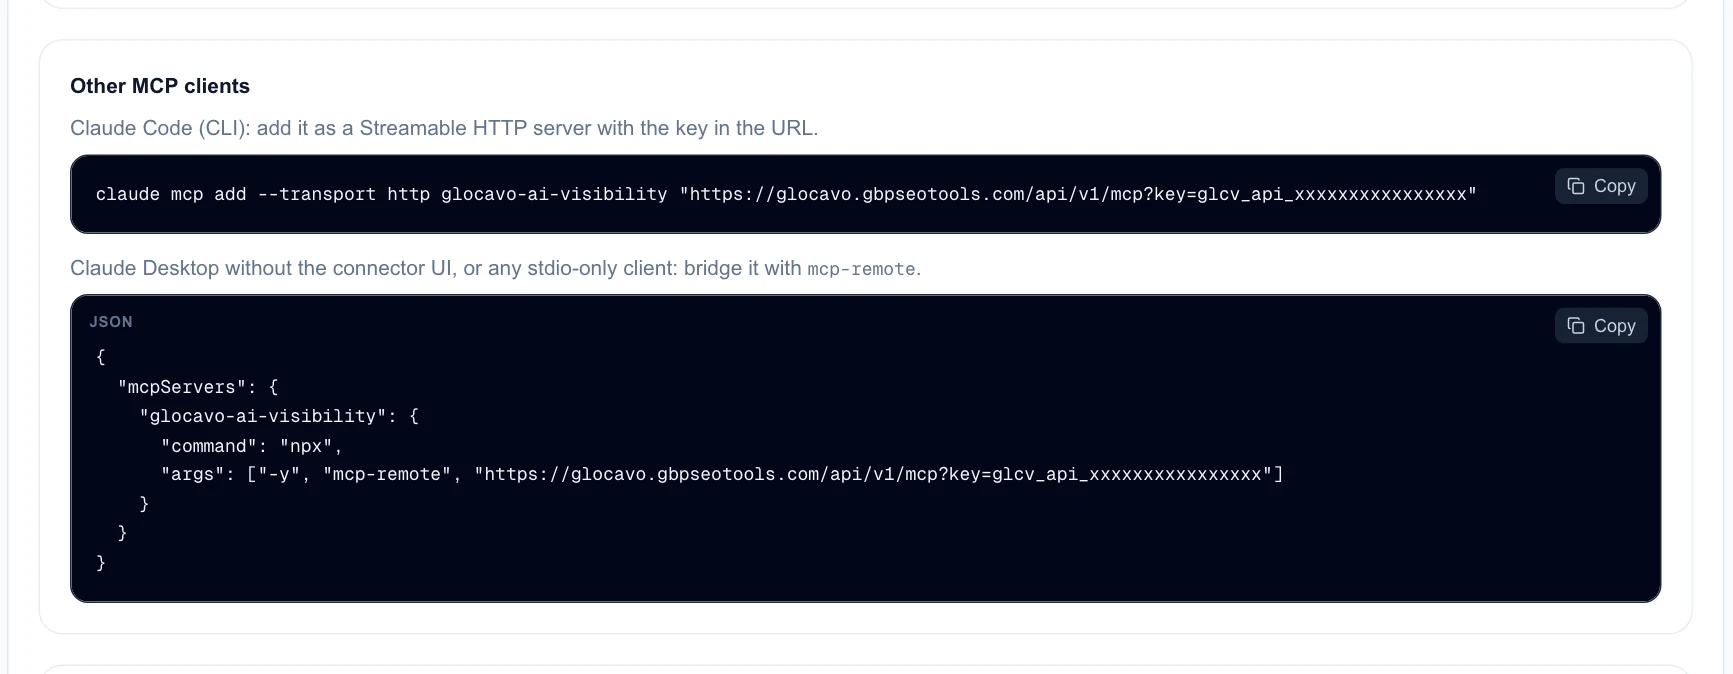
Developers can add the same server to Claude Code with one command, or to any client that only runs local servers through mcp-remote. Both are ready to copy in the app: replace the row of x’s with your key.
The REST API
Read a report from any tool
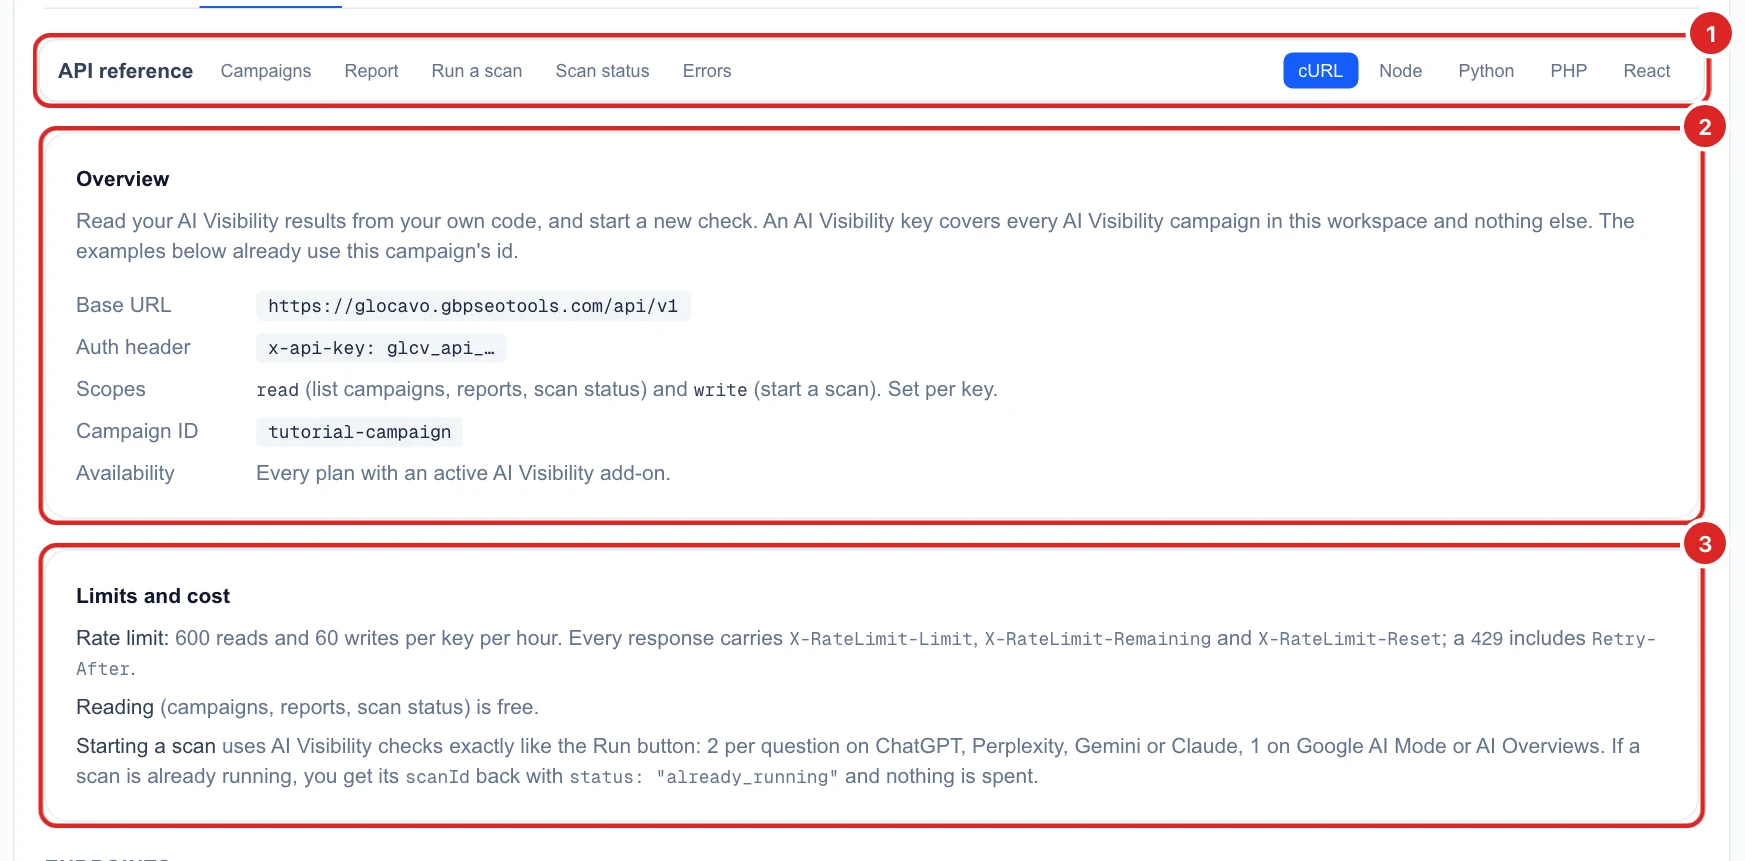
The REST API tab is the full reference. Pick your language at the top (1): cURL, Node, Python, PHP or React, and every example switches. The overview (2) and the limits (3) cover the basics:
- Every request sends your key in an
x-api-keyheader. - Up to 600 reads and 60 writes per key per hour.
- Reading is free; starting a scan uses checks, and nothing is spent if one is already running.
The one request most tools need returns the campaign’s latest report:
curl https://glocavo.gbpseotools.com/api/v1/ai-visibility/campaigns/YOUR_CAMPAIGN_ID/report \
  -H "x-api-key: YOUR_API_KEY"
It answers with the AI score (report.summary.score), each engine, every question, the businesses named, the sites cited, any wrong facts (report.wrongFacts) and what changed since the scan before (report.changes). Add ?scanId= to read an older scan.
Zapier, Make, n8n and Google Sheets
There is no Glocavo app to install in these tools. Each of them has a general web request step that calls any API, and that is all you need: the report address from step 4 and your key as a header.
Zapier
- Create a Zap. As the trigger, pick Schedule by Zapier, for example every Monday morning after your weekly scan.
- Add an action: Webhooks by Zapier → GET.
- In URL, paste the report address from step 4.
- Under Headers, add
x-api-keyon the left and your key on the right. Test the step: you should see your report’s fields. - Add what you want to happen next, for example a Slack message or an email with the AI score (Report Summary Score) and any wrong facts.
Webhooks by Zapier is included in Zapier’s paid plans. Add a Filter step to send something only when it matters, for example only when there is at least one wrong fact.
Make and n8n
It works the same way in both:
- Make: add the HTTP app’s Make a request module. Method GET, the report address as the URL, and a header
x-api-keywith your key. Turn on Parse response so the next modules can use each field. Start the scenario with a schedule. - n8n: add an HTTP Request node. Method GET, the report address as the URL, then Send Headers with
x-api-keyand your key. Start the workflow with a Schedule Trigger.
Google Sheets
A formula like IMPORTDATA cannot send a key, so use a small script instead. In your sheet, open Extensions → Apps Script and paste this, with your campaign ID:
function logAiVisibility() {
  var key = PropertiesService.getScriptProperties().getProperty("GLOCAVO_KEY");
  var url = "https://glocavo.gbpseotools.com/api/v1/ai-visibility/campaigns/YOUR_CAMPAIGN_ID/report";
  var res = UrlFetchApp.fetch(url, { headers: { "x-api-key": key } });
  var report = JSON.parse(res.getContentText()).report;
  SpreadsheetApp.getActiveSheet().appendRow([
    report.scan.completedAt,
    report.summary.score,
    report.wrongFacts.length,
  ]);
}- In Project Settings → Script Properties, add
GLOCAVO_KEYwith your key. That keeps the key out of the sheet itself. - Run
logAiVisibilityonce and allow access when Google asks. - In Triggers, add a time-driven trigger, for example weekly. Each run adds a row with the scan date, your AI score and the number of wrong facts, so the sheet becomes your own history.
Start a scan from another tool
With a key that has write access, a tool can also start a scan, then check on it until it is done. Each scan uses the same checks as the Run AI check button.
curl -X POST https://glocavo.gbpseotools.com/api/v1/ai-visibility/campaigns/YOUR_CAMPAIGN_ID/run \
  -H "x-api-key: YOUR_API_KEY"

curl https://glocavo.gbpseotools.com/api/v1/ai-visibility/scans/SCAN_ID \
  -H "x-api-key: YOUR_API_KEY"
The first request returns a scanId. The second one shows its progress, and the AI score once it is completed. Then read the report as in step 8.
Most people never need this: your campaign’s own schedule already runs the scans. Read the report after each scheduled scan instead, and you spend no extra checks.
Next
Connect Claude click by click in Connect Glocavo to Claude with MCP, or see how checks are counted in How AI Visibility checks work.